 |
Michael
Hooker Microscopy
Facility
(MHMF.ORG) |
 |
Using Volocity
These are terse notes on using Volocity are (more) specific to version 4.4.
1. Using Volocity
- Start Volocity
- Create or open a library
2. Loading Images from microscope scans
- Zeiss database:
- File ->
Open -> New Library
-
In
the white area of the Library window
- Right-click
- Select
Create -> Image Sequence
- A blank
Image Sequence window will appear
- Drag
and drop the desired .lsm file into the Image Sequence window
- Indicate the number of color channels and time/channel naming order
(usually "Channels, then Z-series...") when
prompted and press OK
- You
should see one thumbnail for each color channel in the Image Sequence
window. You will probably have to expand the window to see them all if
there are more than one.
- Leica series:
- File -> New Library (ctrl + N) or
File -> Open (ctrl + O)
- Load image database by:
- Dragging the .lei file or .lif file
(see *Note below) into the gray
"Library" space
- or
- In
the white area of the Library window
- Right-click
- Select
Create -> Image Sequence
- Double click on the Image Sequence Entry
- A blank
Image Sequence window will appear
- In a Windows folder window, highlight all images from .tif series
images
- Drag and drop the group of images into the Image Sequence window
When prompted,
- Indicate the number of color channels and time/channel naming order
(usually usually "Channels, then Z-series, then time) and press OK
- You
should see one thumbnail for each color channel in the Image Sequence
window. You will probably have to expand the window to see them all if
there are more than one
- *Note: .lif files
will not import if the .lif image database contains xz scans
or xy scans with large dimensions (8192 pixels will not work).
Importing will cause Volocity to either give an error message or crash.
Z-series and time lapses should import correctly after removing xz or
overly large xy scans in the Leica LAS viewer or in the acquisition
software.
- Olympus confocal series in .oif format:
- If images are in .oib format make an .oif version using
the Olympus FV10 software on \\Sutton (or install and use the free
FV10-asw 2.0c viewer,
or later,
on your PC computer)
- File ->
Open (or File -> New Library, ^N)
-
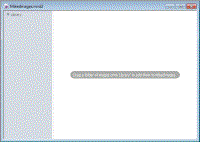 File
-> Import the .oif file (or drag the .oif file from
Windows Explorer into the Volocity
Library window pane)
- May need to change channel colors
- May need to check that image dimensions are correct (right click on
image and hit properties)
- Importing Olympus 3D time series stacks (4D image data) e.g. MATL
data (multi area time lapse z-stacks)
- After a MATL has completed just dragging the append folder to the
Library windows pane will provide a fairly well organized 4-D series.
- Color for channels will need to be manually set. This is best done
after all the tracks are imported, then selecting all the volumes so that
color is changed on all track volumes at once.
- Choose one or more spliced sequences
- Tool -> Change Colors - select appropriate color for one channel at
a time
- - or -
- If volumes need to be manually assembled or the MATL has not completed
or an append series has not been generated:
- Drag .oif files into gray Library area (or File -> Import -
select .oif files)
- Select library items there are part of the same image series (i.e. have
same dimensions, e.g. 3-D stacks at different times, but not different
positions)
-
 Right
click on selection and choose Splice Sequences
- Choose one or more spliced sequences
- Tool -> Change Colors - select appropriate color for one channel at a
time
- C-Imaging series -e.g. Spinning Disk Confocal Stacks, Fluorescence
Dissecting/Macro-scope
- Talk to facility personnel
- Biorad PIC format
- Contact Michael
- Or just click and drag the .pic files into an image sequence window.
- Free standing tiff files
3. Organizing Images in Volocity Database
- 3.1 Copying
- 3.2 Renaming
- 3.3 Combining
- Single times points into a time series
- In the library panel select images which are to be combined
(Left mouse clip on first, hold Shift, left mouse click on last;
Individual images can be selected of deselected by holding down
crotrol key and pressing left mouse button)
- Right click on slected images and choose "Splice sequences"
- New combined image is created and will appear at bottom of
library
- Can move, e.g. closer to individual images, by left clicking
inage icon and dragging
- Combining individual channels into an overlay
- Select images of the different channels to be combined
- Right click on slection ---> Create New ---> Image
Sequence from selection
- Edit dimensions if necessary
- 3.4 Changing displayed colors
- 3.5 Hiding channels
- 3.6 Removing
- 3.7
4. Displaying
4.1 Orthogonal view (Image tab) [V6]
- Click or double click on the an entry in the Library
-

- Click on "Image" tab
- Right click on image and choose viewing mode

- Scrolling tools - Inspection Tool -> can use mouse to scroll through
slices
- Use CHS1 & CHS2 & etc. sliders to adjust relative intensities
- Hit the slow/hide channel square button to turn on/of each channel
- The square button with a red target selects the channel for operations.
- Cropping
- Select the "Rectangular ROI tool"
- Resize with mouse
- Actions ---> Crop to Selection (Cropped image becomes a new entry in the
Library)
- Select "Selection Tool" and place cross hairs inside selected region.
Since we are dealing with 3-D space so this is worth doing in case thins are
strange.
-
 Changing
channel colors - Tools ---> Change Colors
- Select channel then choose color button for each channel
- Selecting/Deselecting
- Selection shapes - Geometric
- Rectangle | Freehand ROI tool | Circular Freehand Tool
|
- Selection based on intensity
- Lasso
-
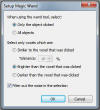 Magic
Wand
- Double click - only/all objects | Brighter than, Darker Than | Similar
with tolerance levels | Filter out noise. ( makes selection smoother)
.
-
 Click
inside shape and press deleted (object 2 will deleted by pressing the
"Delete" key on the keyboard)
- ^E (control - E ) deselects all or 2 clicks in a
non-selected area also deselects all
3. Measurements
- Select "Measurements" tab
- Things that may help with selections:
- Zoom tool
-
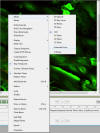 Changing
viewing mode - e.g. Extended focus
- Changing brightness
- Select channel on which selection is to be based
4. Rendering
- Modes - Opacity
- Brightness
- Density (Opacity)
- Black level
5. Create Movie Sequence
- Right-click in the white space of the Library window
- Create a new Movie Sequence
- A window “Untitled Sequence” will open
- Insert actions (rotating, zooming, etc), durations, etc.
- IMPORTANT NOTE: The orientation of the image as
it is displayed in the Image Window is the starting point for the Movie
Sequence.
- To ensure consistent rotation, orientation,
etc. in subsequent plays of the movie, always reset the image view
to zero rotation.
- To reset image view, right-click on the image
and select Reset View.
- When movie sequence is complete, select newly created sequence rectangle
in the image database
- Go to menu bar item Sequence -> Make Movie
- NOTE: This will apply the highlighted Movie Sequence to ALL of the
Image Sequence files open from the image database library!
- The movie will be added to the Library with a folder icon
- Export Movies from created folder
-
Right-click on the Movie file (in the Library Window)
- Choose
Export
- Select options and choose
codec. On Windows
XP 64 bit only the "Microsoft Indeo 1" or "Intel IYUV" codecs are
available. Save in this format and use another program (e.g.
QuickTimePro) on another computer to convert to, preferably,
uncompressed or the Cinepak codec in order to be compatible with Power
Point on a Windows XP (standard 32 bit) computer. For Apple users
convert to a QuickTime format.
6. Colocalization Analysis
-
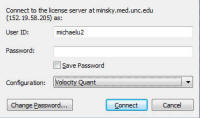
- Ensure have started Volocity with the Quant(itation) Option selected
- Create a Volocity library and drag in files (or open an existing
library)
- Click on image to analyze
-
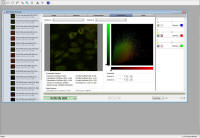
- Select colocalization tab
- Select channels to compare
- Channel brightness sliders may be adjusted to get a good bright and
balanced view. Nte: This has no effect on quantization.
- Set background levels for thresholding
- Select a shape tool
- Outline dark area with no features in the image panel
- Press the blue threshold dropper for each channel
-

- Click outside the selected image to clear the selected region
- Scattergram will be for entire area where pixels are above the
threshold level (don't want colocalization statistics for dark area,
i.e. background)
 File
-> Import the .oif file (or drag the .oif file from
Windows Explorer into the Volocity
Library window pane)
 Right
click on selection and choose Splice Sequences

 Changing
channel colors - Tools ---> Change Colors
 Click
inside shape and press deleted (object 2 will deleted by pressing the
"Delete" key on the keyboard)
